-
Echo Knowledge Base
-
-
- Article Page Width
- Article Layout
- Article Sidebars
- Article Page FAQs
- Embedding Google Documents in Articles
-
Add-ons
-
Access Manager
Import Articles with CSV File
0 out Of 5 Stars
| 5 Stars | 0% | |
| 4 Stars | 0% | |
| 3 Stars | 0% | |
| 2 Stars | 0% | |
| 1 Stars | 0% |
CSV Import feature let’s you easily create and update articles and categories for your Knowledge Base.
CSV file format and examples are shown here.
For detailed information about data in CSV file and the differences between CSV and XML, read this overview article.
- Perform the import during non-busy hours.
- We highly recommend you test the import and export on a staging or test site before running it in production.
- Always back up your database before starting any import and thoroughly test KB content after the import is complete.
Make sure your CSV file is correctly formatted. Please read about CVS File Format and Examples
Please note that if you are using Excel or Google Sheets to create CSV files you will not be able to enter above these character limits per cell: Excel limit of 32,767 characters and Google Sheets limit of 50,000 characters.
- Article post status will be set as Draft unless specified in the Status column.
- If the KB at the destination website has a custom sequence for categories and/or articles, the imported categories and articles will be placed at the end of the list of articles.
- If a category exists, regardless of its parents, it will be used to assign it to the imported articles with the same category.
- If a category does not exist, it will be created but empty categories will not be exported and imported for CSV format (unlike XML format).
- Categories assigned to an article but not in the article import will be unassigned.
- If Access Manager is active, articles are set to private and assigned to the admin running the import.
- Import files contain article content. The files are stored in the wp-content/upload/echo-knowledge-base folder. At import start, import completion, and during scheduled Cron (6pm the next day) the files should be deleted. Check the directory and delete any files left over.
- Only a single license is required to migrate content between sites.
- Articles are matched with existing articles based on article title, date, content and assigned categories.
- Linked articles are not included in the export. Use XML Export if you need to export linked articles.
- Ensure that you match KB category names from the CSV file with those in WordPress if you want to keep articles assigned to them.
- If the user does not want the article overwritten, they have three options:
- Uncheck the article check box in the first step of the import.
- Change the Article name in the WordPress admin.
- Change the Article name in the CSV file.
Step-by-Step Guide
Please ensure you have the Import/Export add-on installed and the license key activated before starting this process.
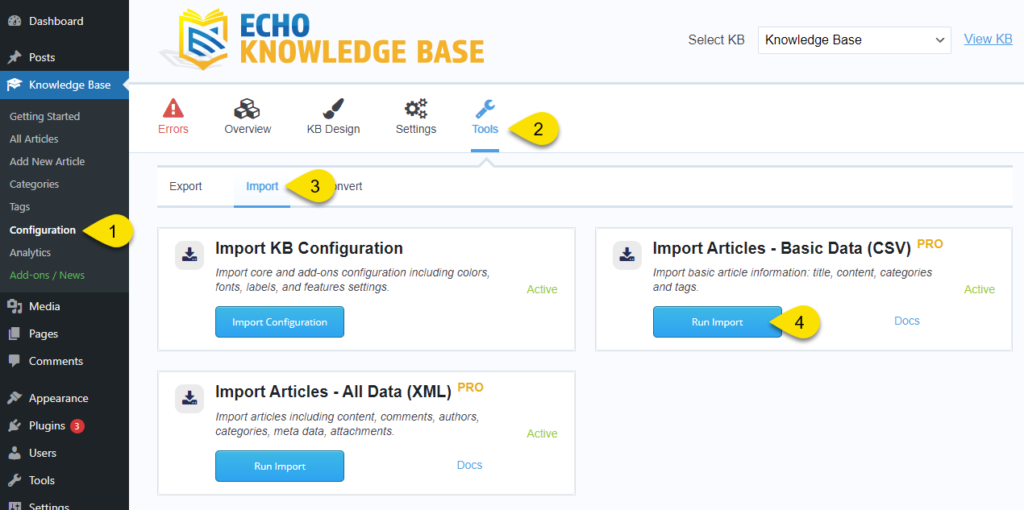
Step 1 Navigate to the Import feature
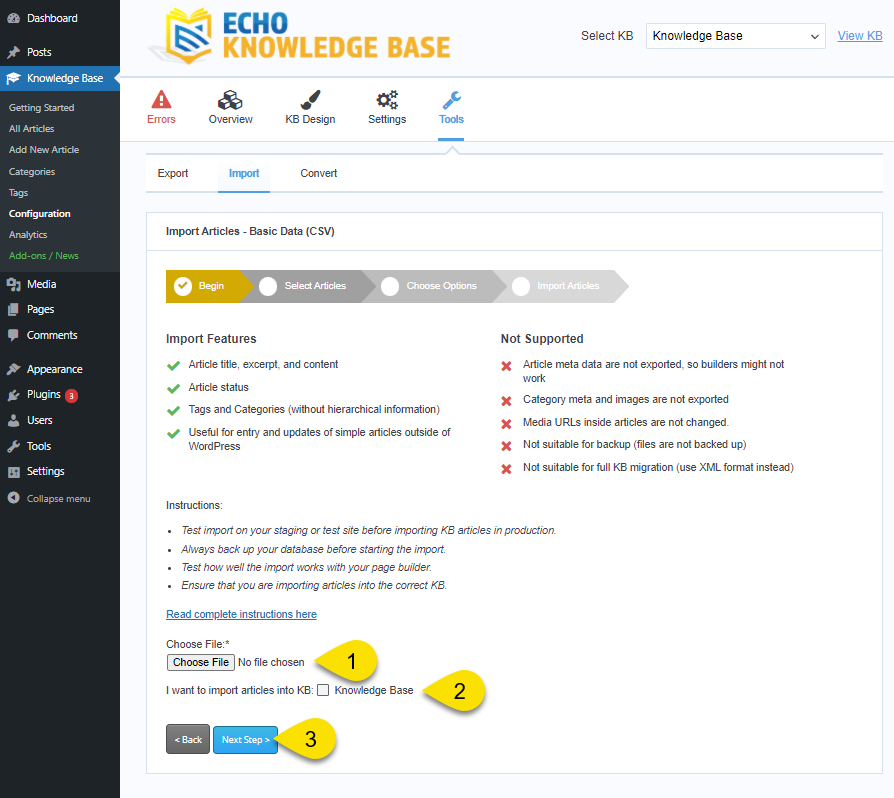
Step 2 Begin: Import File
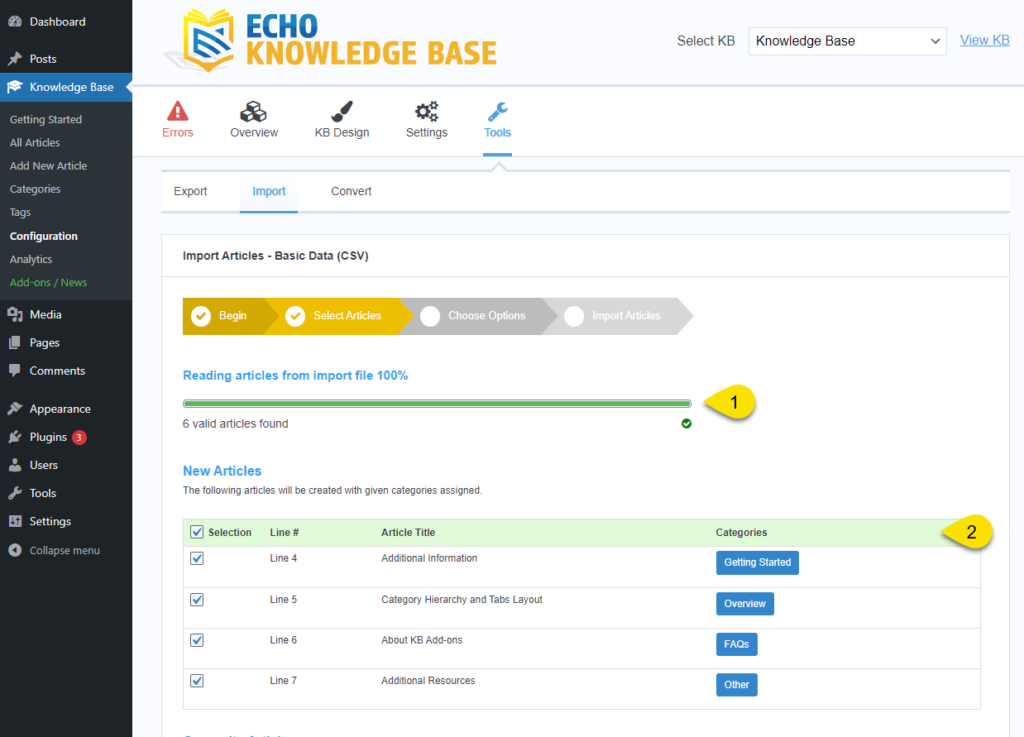
Step 3 New Articles Table - Select Articles to Create
- Status Bar shows how many articles were found.
- New Article table shows articles that were searched but not found in the selected Knowledge Base. New articles will be created if selected. Articles are matched based on their title and location within categories.
- You can select all articles or only articles that you want to be imported.
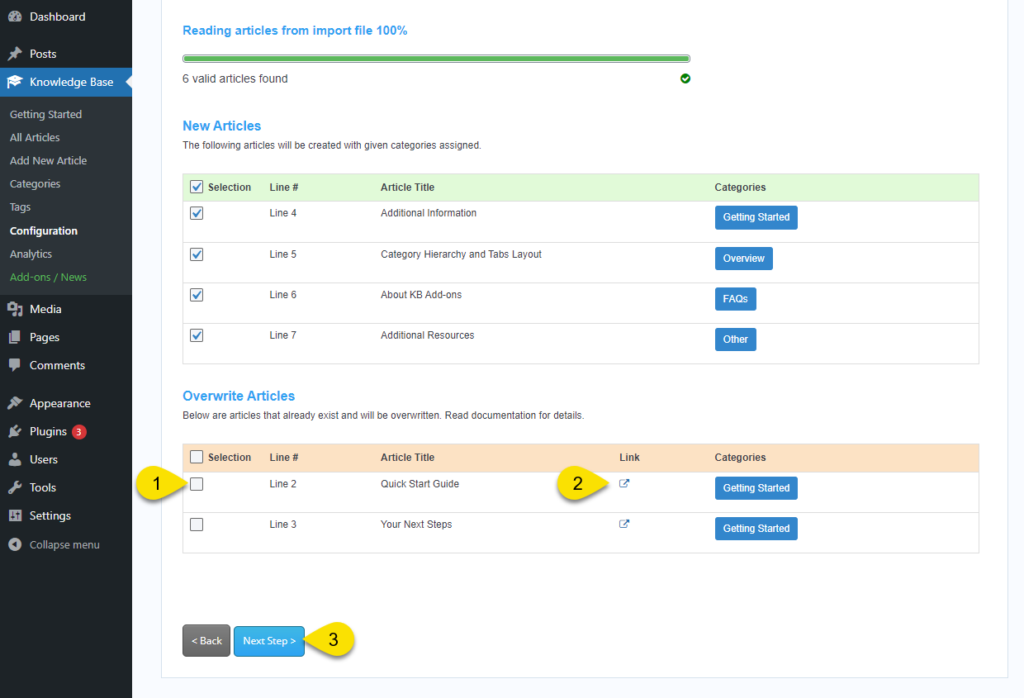
Step 4 Overwrite Articles Table - Select Articles to Update
The Overwrite Articles table contains articles that match by their title and categories with existing articles. If selected, they will overwrite existing article title, content, categories, etc.
-
- Checkboxes: You can un-check articles that you do not want to override.
- Link Column: Open the article to view what you are overwriting.
- Next Step: Click "Next Step" when ready.
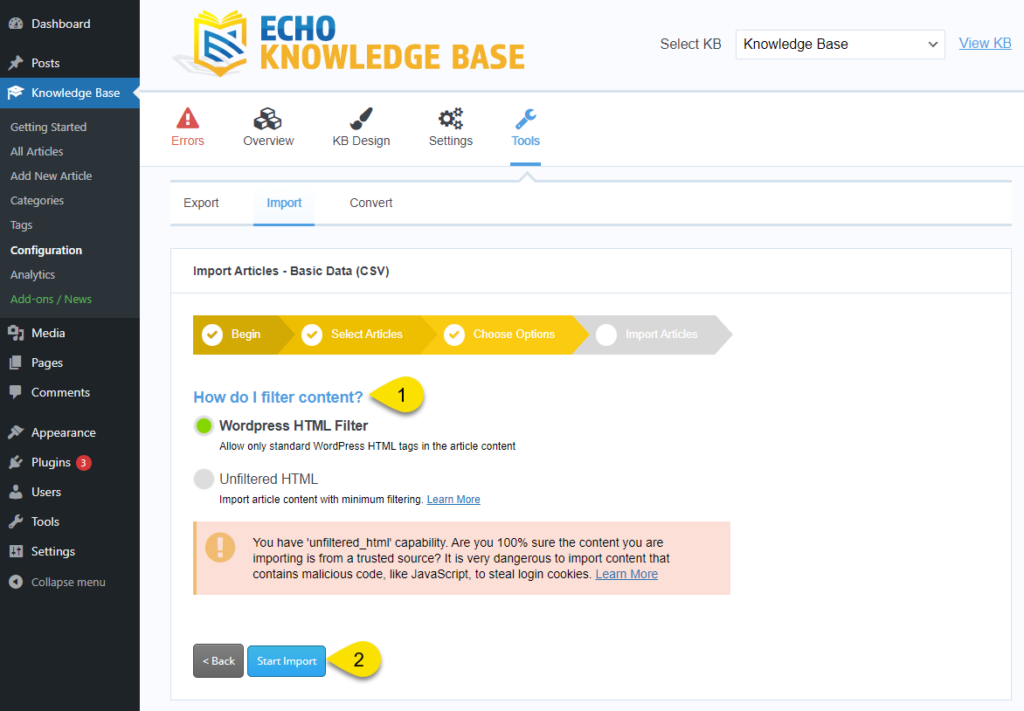
Step 5 Choose Options
Note: The Start Import button will launch the importer to write data into your database. You can stop the import at any time, but articles already created and updated will not be reverted.
- Ho do I Filter Content? option controls security filtering of article content. To learn more, click here.
- Click "Start Import" when ready.
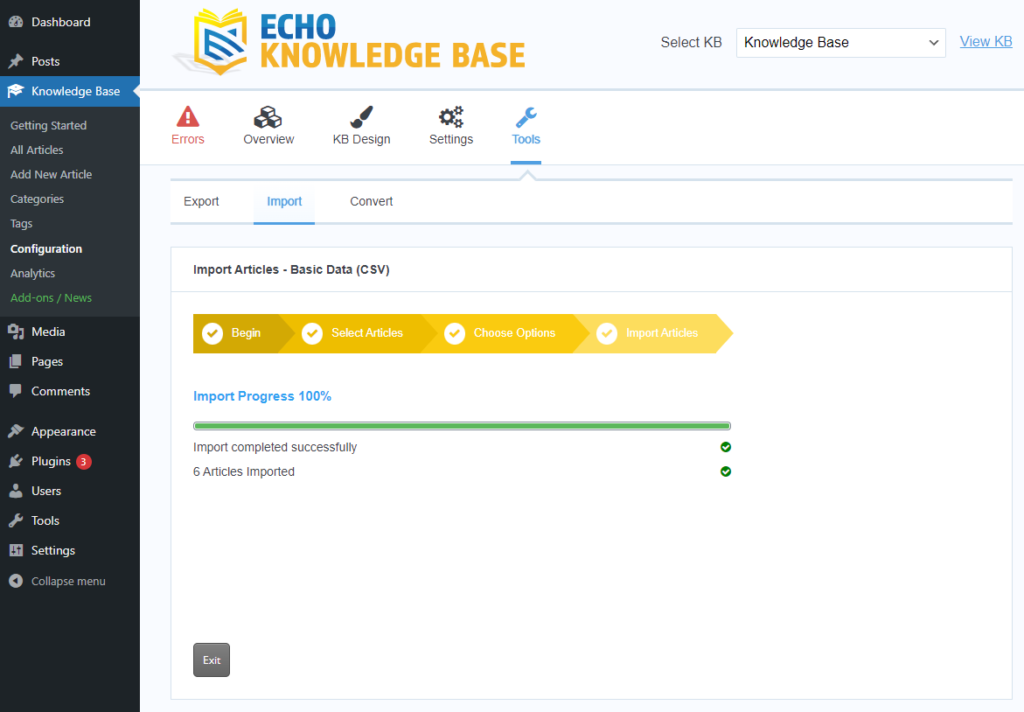
Step 6 Import Articles
Your final step displays your status of the import.
If you see Errors, please click here for more information.
Once the import is complete, review the content that was imported and revert from backup if you need to redo some import data.
Quick checklist
- Check article images, PDF, documents, and other files make sure they all work.
- Review blocks, widgets, and other builder components.
- Check Article Categories and tags.
- Check Publish status if it's correct.
- Check article layout to make sure it looks correct. If it doesn't, try editing it and re-saving it.
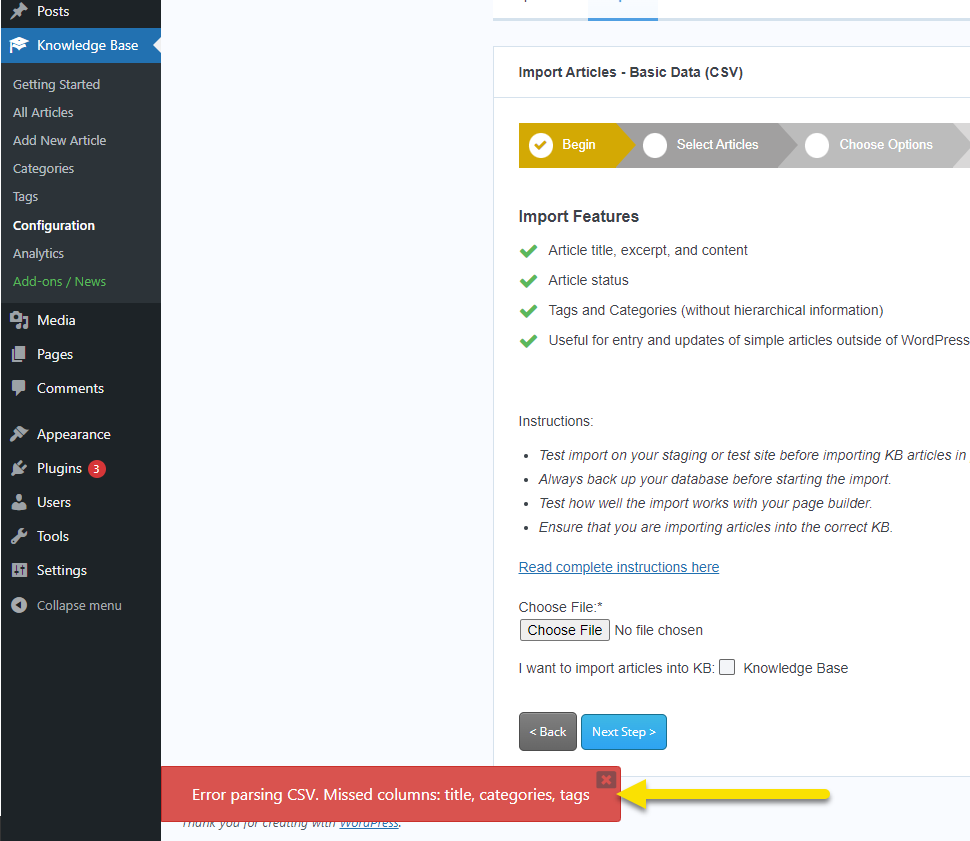
Example of Import Error
During import, if you have errors in your CSV file, a message will appear at the bottom preventing you from importing the CSV.
0 out Of 5 Stars
| 5 Stars | 0% | |
| 4 Stars | 0% | |
| 3 Stars | 0% | |
| 2 Stars | 0% | |
| 1 Stars | 0% |

